Monday 25 November 2013

MMC140 - Major Project

The Major Project requires you to produce images in response to a brief and through a documented process of research and development.

You have two different Project Options. You need to choose one:
(a) Project Option 1: Cultural Portrait (Montage)
(b) Project Option 2: Mythical Creatures (Scanograms)   <== I chose this

Each of these options has a different creative theme and utilises a different set of techniques.  Review the learning materials for both options this week and choose one.

This process will require you to produce two assessment items per project:

1. Concept Development Journal

This requires you to document the conceptual development of your project. The investigation of your ideas and concepts. The Concept Development Journal is worth 25% (25 points) of your final grade.

Tutor Comments:
Very well done! You've received a High Distinction level grade. 


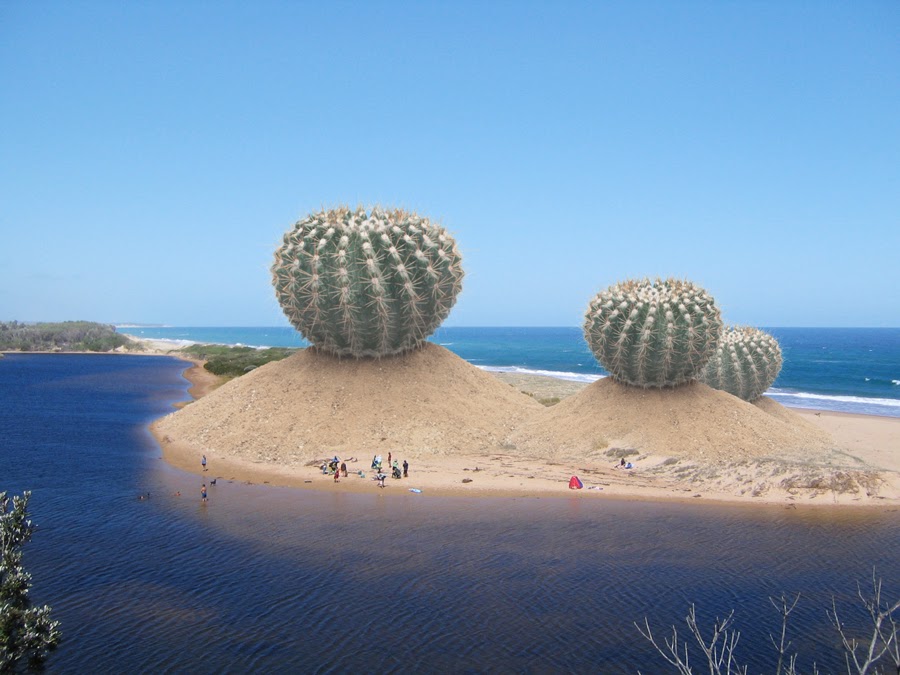
The theme you’re choosing to work on fits in well with the brief – its reversal of what traditionally may make up the creature’s top and what is below is a playful twist.

You have made a very comprehensive journal that clearly defines your ideas, and uses relevant reference material aligned with sketching to develop them further. You make very good use of Photoshop as a digital Scanogram tool. Your confident application of the techniques are shown in the initial stage-by-stage development of your imagery. It will be interesting to see how you continue to develop your ideas into the Final Project Image.


Final Grade: 21.5/25 - 86% (Highest Distinction ever!)

2. Project Image

The Final Image(s) you create in response to the brief and the culmination of your research and development. The final project image is worth 25% (25 points) of your final grade.


Tutor Comments:
Very well done! You've received a High Distinction level grade and passed this assignment at an exemplary level of technical and creative achievement. Technically, your images demonstrate a very good understanding of the tools and techniques demonstrated in the tutorial.


Creatively, your works are well composed, have clearly identifiable and executed themes, and demonstrate a high level of thought, care and attention to detail in their construction.


In terms of the formal, graphic aspects of your imagery, you’ve effectively applied textural effects that enhance the impression of realism of your striking Lion Creature. This also gives the surfaces a tactile quality, which adds a valuable extra dimension to your imagery.


Also, you've emphasized the naturalism within your scene through a subtle emphasis of contrasts of light and shade on all the forms in your composition. This gives to the imagery a stylistic cohesiveness, which unifies the composition and enhances its impact.


Overall in this assignment, you’ve made excellent use of Photoshop as a medium for constructing Scanogram imagery, and displayed commendable compositional skill. You've also shown talent for developing very engaging and interesting narrative and decorative qualities in your work.


Final Grade: 20/25 - 80% (High Distinction)

Total unit grade: 77% (Distinction). Woohoo! :)
Share:

Tuesday 29 October 2013

The Tong Master

To honour the approach of the Aussie summer BBQ season.

An oldie but a goodie. I didn't write this, just found it in an old "Funnies" email folder. I've just Googled and full credit should go to Danny Katz, but the version I have has different names and additional bits so I'll copy all I had here, and state again quite clearly that I didn't write any of it and I'm not attempting to plagiarise or profit in any way. It's just bloody funny :)


***************************************
THE TONG MASTER

Jeff was at the barbecue and Joel was at the barbecue and I was at the barbecue; three men standing around a barbecue, sipping beer, staring at sausages, rolling them backwards and forwards, never leaving them alone.

We didn't know why we were at the barbecue; we were just drawn there like moths to a flame. The barbecue was a powerful gravitational force, a man-magnet. Joel said the thin ones could use a turn, I said yeah I reckon the thin ones could use a turn, Jeff said yeah they really need a turn, it was a unanimous turning decision.

Jeff was the Tong-Master, a true artist, he gave a couple of practice snaps of his long silver tongs, SNAP SNAP, before moving in, prodding, teasing, and with an elegant flick of his wrist, rolling them onto their little backs.

A lesser tong-man would've flicked too hard; the sausages would've gone full circle, back to where they started. Nice, I said. The others went yeah.  Kevin was passing us, he heard the siren-song- sizzle of the snags, the barbecue was calling, beckoning, Kevinnnnn ...come.

He stuck his head in and said any room? We said yeah and began the barbecue shuffle; Jeff shuffled to the left, Joel shuffled to the left, I shuffled to the left, Kevin slipped in beside me, we sipped our beer.

Now there were four of us staring at sausages, and Jeff gave me the nod, my cue. I was second-in-command, and I had to take the raw sausages out of the plastic bag and lay them on the barbecue; not too close together, not too far apart, curl them into each other's bodies like lovers - fat ones, thin ones, herbed and continental. The chipolatas were tiny, they could easily slip down between the grill, falling into the molten hot-bead-netherworld below. Carefully I laid them sideways ACROSS the grill, clever thinking.  Jeff snapped his tongs with approval; there was no greater barbecue honour.

P.J. came along, he said looking good, looking good the irresistible lure of the barbecue had pulled him in too. We said yeah and did the shuffle, left, left, left, left, he slipped in beside Kevin, we sipped our beer.

Five men, lots of sausages. Joel was the Fork-pronger; he had the fork that pronged the tough hides of the Bavarian bratwursts and he showed a lot of promise. Stabbing away eagerly, leaving perfect little vampire holes up and down the casing. P.J. was shaking his head, he said I reckon they cook better if you don't poke them. There was a long silence, you could have heard a chipolata drop, and this newcomer was a rabble-rouser, bringing in his crazy ideas from outside. He didn't understand the hierarchy; first the Tong-master, then the Sausage-layer, then the Fork-pronger - and everyone below was just a watcher.

Maybe eventually they'll move up the ladder, but for now - don't rock the Weber. Dianne popped her head in; hmmm, smells good, she said. She was trying to jostle into the circle; we closed ranks, pulling our heads down and our shoulders in, mumbling yeah yeah yeah, but making no room for her.

She was keen, going round to the far side of the barbecue, heading for the only available space . . . the gap in the circle where all the smoke and ashes blew. Nobody could survive the gap; Dianne was going to try. She stood there stubbornly, smoke blinding her eyes, ashes filling her nostrils, sausage fat spattering all over her arms and face. Until she couldn't take it anymore, she gave up, backed off.

Kevin waited till she was gone and sipped his beer. We sipped our beer, yeah. Jeff handed me his tongs. I looked at him and he nodded. I knew what was happening, I'd waited a long time for this moment - the abdication.  The tongs weighed heavy in my hands, firm in my grip - was I ready for the responsibility? Yes, I was. I held them up high and they glinted in the sun.  Don't forget to turn the thin ones Jeff said as he walked away from the barbecue, disappearing toward the house.

Yeah, I called back, I will, I will. I snapped them twice, SNAP SNAP, before moving in, prodding, teasing, and with an elegant flick of my wrist, rolling them back onto their little bellies.

I was a natural, I was the TONG-MASTER.

But only until Jeff got back from the toilet.
Share:

RIP Molly :(

RIP Molly, 3/10/2013.  Lots of memories over the last 13 years. My daughter asked how we would remember everything about Molly, so this is for my kids:
  1. Puppy toilet-training. Old wooden floorboards, with gaps. OMG. :(
  2. Eating. Every. Single. Thing. Especially timber (ie. house). And chicken-wire. That house will never be the same.
  3. The first 8 attempts to take her for a walk, and her refusing to leave the property. (Problem finally solved one day by the boys a few doors down, who hauled her out. Thus beginning a lifetime of escapes. Ahh, the irony.. ).
  4. Retrieving her from the neighbours a few doors down, repeatedly, whenever she escaped while I was at work and they kindly kept her until I got home. (I secretly think she liked their backyard better than mine).
  5. Retrieving her from the dog pound, when they weren't home either. :/
  6. "Who Let the Dogs Out?" by Baha Men. Blasted loudly through my office upon my late entrance one morning, after an early-morning visit to the pound. Thanks to Paul and co at Vodafone, for THAT memory. :)
  7. Digging. Every. Single. Thing.
  8. Taking her in the car to my not-yet-husband's house because my house didn't have a bath. Black dog hair EVERYWHERE. (And he still married me).
  9. Seeing my not-yet-husband's look of disbelief when I told him Molly did not like cars and would under no circumstances put her head out the window, no matter how much he wanted her to. And his frustration after several unsuccesful attempts. ("But dogs are meant to do this! It's just embarrassing!!).
  10. Completely ignoring, and even turning her back on my daughter for the first 6 months of her life, because she was so offended by her very presence (hilarious).
  11. The day my daughter started to crawl, and immediately set her sights on Molly, much to her horror (even more hilarious). But from that moment on, they were best of friends. :)
  12. The day I looked outside and saw my daughter asleep, on Molly.
  13. Her eternal patience with all kids, no matter what they did to her.
  14. Her sheer excitement at the word "walk". Even if you whispered it LOL.
  15. The day we drove with my mother-in-law, daughter and Molly in the backseat, and my mother-in-law insisted on sitting on "Molly's side" of the car - and had to endure a very pissed-off black labrador attempting to sit on her the entire way (hilarious for us, not so much for my mother-in-law).
  16. All the phone calls I got over the years that went like this:
    "This might seem like a strange phone call, but I've got this black labrador that came into my yard/driveway/garage/..."
    "Yes, thank you so much for calling, I'm really sorry, what's your address and I'll come and get her? No, she's not a puppy any more, she's actually 10 (6/8/12/13), you'd think she'd know better. No, not the first time, not by a long shot..."
    (Thanks to Molly I met many, many neighbours, the local bank manager and several local retirement village residents, where I found her happily sitting one evening while the residents sat chatting with their cups of tea).
  17. Trying to make her do something she didn't want to. Like the collar, after her operation, OMG. You could always tell when Molly was pissed off because she'd refuse to look at you LOL :)
  18. Hearing her claws tap-tapping across the back porch, as she searched for something to chew/dig/destroy.
  19. Watching my kids grow up with her.


I remember someone telling me in the early days "just wait till you have kids, if you think the dog is bad!". In all honesty - the dog was worse :) But I miss her. Thanks for the memories, "Molly-Dog" :)


Share:

Friday 18 October 2013

MMC140 - Exercise 2

LOVING this unit, easily my favourite so far... this was the brief for Exercise 2:

Theme & Style
This assignment could be described with the phrase Magic Happens. We want you to combine at least two separate images to create a realistic ‘Photograph’ of something that would not ordinarily be possible in real-life. From a creative perspective, we want images that explore themes like ‘magical’, ‘miraculous’, ‘surreal’ and ‘dreamlike’. From a technical perspective, this will require you to create a convincing illusion of a fictional reality. Like any good illusion, we don’t want to see evidence that the image is obviously fabricated. The audience may know they are looking at a fictional construct, but if your image follows a consistent set of visual rules and internal logic, people will happily ‘suspend disbelief’ and allow them selves to become immersed in your image.

And here are my 2 submissions:
Exercise 2A
Exercise 2A: I took this photo earlier in the year on a roadtrip around the South Island of New Zealand. At the time I laughed with my kids about the small car "chasing" us, so I thought it might be fun to have something much larger chasing us. I'm really happy with the way this turned out, particularly the reflection of the monster on the side of the car and the shadow underneath. My 7yo thought it was real!
Exercise 2B
Exercise 2B: When I saw the provided images I had an idea of making "pigs fly" in a child-like dreamscape, but had to experiment with several pig and wing options before settling on the ones I eventually used. I chose the background image from my New Zealand trip; it was one of about 20 taken at dusk from the Te Anau Glowworm Caves and I felt this one had the right tones to match the flying pigs, although I toned it down a little. Finally I added a photo I took of the moon in Feburary this year with my super-zoom lens, and then experimented with a subtle moon reflection on the water. My 10yo loves this so hopefully I achieved the "child-like" goal I was aiming for!

Final Grade: 18.5/25 - 74% (Distinction)
Share:

Friday 11 October 2013

MMC140 - Wk 7-8: Shadows, Filters, Layer Masks & other useful tools

Attention! This post probably won't be interesting to anybody but me - just noting down some new and potentially-useful-in-the-future techniques. :)

Paths - used in the tutorial as a quick way to select an outline. However, most images won't have them unless somebody has already defined them, so IMHO a relatively pointless thing to teach. If there isn't a path you need to select the part of the image you want using either Magic Wand, Rectangular and Circular marquee, Lasso tool or Quick Selection tool, then copy/paste into the second image. I'll call these "Background", "Image" and "Shadow" layers so it doesn't get too confusing!

Shadows. I admit, this is cool, I should have Googled how to do this ages ago so I'll detail here how to do it for my own future reference:
  1. Duplicate the Image layer you want to add a shadow to (drag layer down to the New Layer icon - didn't know this!).
  2. Select Shadow layer (the one below the copy/Image layer), click on "Lock Transparency icon" - the purpose of this wasn't made entirely clear but the explanation provided was, and I quote "this will protect the transparency of this layer, which will allow me to fill the shape with a particular colour without having to make a special selection".  Err.. OK, done. (Note: I found this tutorial online, which cleared it up a bit).
  3. Select a shadow colour from the image (Foreground).
  4. Choose Edit/Fill and use Foreground colour.
  5. Edit/Free Transform and shrink height of image, then move below (can also use Skew or any other transform tools, depending on what you're going for).
  6. Edit any parts of the Shadow that still look disproportionate.
  7. Change layer transfer mode from "Normal" to "Hard Light".
  8. Change layer opacity down to about 50%.
  9. Unlock layer transparency (which we locked in 2.) to be able to blur the image.
  10. Filter/Blur/Motion Blur and set angle and distance.
Alternatively you can also just draw a shape with the Polygonal tool, fill with Foreground colour & lower opacity - ie for shadows under feet.

Then make changes to the rest of the image, background etc. These seemed to be fairly specific to the image we were working on so I won't go into them all here, except to note the following:
  1. Background layer - add Hue/Saturation adjustment layer to fade the background out a bit, add Curves adjustment layer to lighten background, make it paler.
  2. Add a Gradient to the Curves adjustment layer so it fades out as it gets closer to the front of the image - this creates depth (and looks cool). Used black to white, 50% opacity gradient applied from the bottom of the background image, up to the middle of the Image.
  3. Image layer - add Outer Glow special effect, settings Opacity 50%, Size 25px - this makes the Image stand out more from the background.
Tutorial 1 - note shadow under log
If it were up to me, I would probably have gone a bit less "washed-out" with this whole image, but anyway...

Another useful tip - sometimes when you paste an image onto another, you get a thin white "shadow" around the pasted image, which has always been a PITA to remove. Of course there's an easy way, which would have saved me literally HOURS over the years if I'd bothered to look it up, grr...
  1. Select/Load Selection
  2. Select/Modify/Contract - 1px
  3. Select/Inverse
  4. Edit/Clear
Tutorial 2 - removalists added - note shadows around feet
Tutorial 3 - blending 2 images, layer masks, gradients
 
Tutorial 3 & 4 were about adjustment layers, layer masks, gradients, dodge & burn tool and more Curves. I personally wouldn't have done the last step of Tutorial 4 and removed the lovely blue sky, but there you go.

For Tutorial 5 we had to add a toy robot to a panorama of New York City, which involved adjusting the robot to match the background. The most useful things I learned here were:
  • If there is a white-ish outline around the inserted image, add an inner glow using a colour from within that image, adjust opacity and size.
  • Putting the robot behind the clouds - previously I would have selected & copied the clouds and pasted onto a new layer, but this is easier:
      * Layer (on the robot)/Layer Style/Blending Options.
      * At the bottom is a heading "Blend if" with 2 sliders, This Layer and Underlying Layer. We can use this to make lighter areas of the underlying layer show through to the top layer.
      * Drag the white arrow on the Underlying Layer spectrum down and see the clouds appear through the image, although very pixelated. If you hold down Alt (Windows) or Option (Mac) you can split the slider and drag it back towards the white end of the spectrum, which makes the blending between the 2 layers more gradual. Cool trick. :)
  • After creating various layer adjustment masks to make all 3 layers match in terms of tone and colour, finish off with a Photo Filter adjustment mask over the whole image (ie. at the top) to bring it all together.
Tutorial 5 - combining 3 images into 1 (not my feet!)
Tutorial 6 was similar to 5 - adding a dinosaur to a lake. The lake image already had the water ripples so this was about adding layer masks and a reflection.
Tutorial 6 - dinosaur, lake. As you do.
Last one - Tutorial 7. Astronaut on an abandoned railway platform. The main focus here was to create a shadow for the astronaut, and put a reflection of the platform onto the front of the visor. Nifty!

Tutorial 7
Best quote from this week:

"Recognising Photoshop's limitations is almost as important as understanding it's capabilities."
Share:

Wednesday 2 October 2013

MMC140 - Wk 6: Changing image content

Last week's tutorial was more about changing tone and colour. This week focussed on changing the actual content of images, including adding and removing items within an image, replacing parts of an image with parts from another image, and creating panoramas from multiple images. The tutor used the term "creating fake photographs of things that don't really exist". I call it "removing unwanted items to enhance an image", but whatever! :)

Some of the new tools used this week include:
  • Crop tool. I've cropped countless times over the years but never used this tool, I usually just highlight the image and then clicked Image, Crop. Using the tool allows you to straighten up images that are slightly crooked at the same time as cropping so I'll have to try to remember this in the future.
  • Cloning tool.
  • Opacity of adjustment layers.
  • Increase canvas size so you can add other images, to create a panorama - use % instead of guessing pixels. Don't know why I've never thought of that (!!)
  • Layer masks - to apply Curves, etc. on just that single layer, not all layers below.
  • Blending 2 layers together using a Gradient.
This week I decided to try to create a panorama from 2 photos I took last year when I went to Machu Picchu in Peru. Here are the 2 "Before" pics. The photos are slightly different shades and taken on slightly different angles so I had to rotate one a bit to get them to line up. They were also taken at 7am with very bright sunlight at high altitude, so they were a bit hazy:


And here is the "After" pic:
I added a Curves Auto layer which helped clear things up quite a lot. I also applied a Deep Blue photo filter, and altered the green Saturation. Don't know if that's all right, but I'm pretty happy with the result!
Share:

Sunday 29 September 2013

MMC140 - Wk 5: Photo editing Adjustment layers

Now we're starting to get interesting! Photo editing! THIS is why I wanted to do this unit. :) I've got a couple of blank walls in my house, and quite a few "almost fantastic but not quite there" shots I've taken over the last few years, so I'm hoping this unit will fill in some of those "self-taught Photoshopper" knowledge gaps and help me make a couple of my photos really pop.

First off the block was the "Curves" adjustment. I'll be honest, I never had a clue what this did so I never used it (and now I'm wondering why not) but apparently the "Auto" option will fix up 9/10 digital photos on the spot. Awesome!

(As an aside, I'm already starting to identify a problem with this unit - right now, I'm ready to abandon the 4 tutorials I need to get through this week, and dive straight into editing my own shots.. but anyway)

For the other 1/10 shots, you can do stuff like changing the Blending mode on the Curves layer. For instance, sometimes the Auto setting will change the colours slightly - to avoid this, set the Blending mode to "Luminosity" to only alter the brightness/darkness values. If the colour is better but it's too contrast-y, set the Blending mode to "Color" and it ignores the contrast. Handy to remember!

Some of the other things we looked at this week included:
  • Hue/Saturation
  • Photo Filter
  • Black & White filter

And here is one of my efforts for this week. I took this photo earlier this year in Queenstown, NZ on a hazy day and I've been wanting to fix it up so I can put it on a canvas, so here's my first attempt.

This is the "Before" pic:
I then applied the Auto curve setting:
Finally, I added a Cyan Photo Filter because I wanted it to have a bluer, calmer tone, and the room it's going in has those colours.
What do you think? Ready for canvas?
Share:

Sunday 22 September 2013

MMC140 - Wk 4: Face masks / Exercise 1

Theme & Style
Beginning with a digital photograph of a human head, use the week 4 tutorial techniques to add masks or facial embellishments (e.g. tattoos) to the underling faces.

Portraits are an opportunity to explore human identity and emotion. Such images can describe a kind of character or express an emotional state.

To do this you can use the faces as a foundation to create a more intense and focused portrayal of character. If the person in your portrait looks dreamy, then use the mask to make them look more dreamlike. If they look slightly mean, make them look intensely threatening etc.

Alternatively, to invoke a kind of specific character (e.g. devil, angel, clown or Cyborg etc.) you need to (a) identify and then (b) create, the appropriate forms, shapes, textures and colours etc. that will illustrate this idea.

I'm not sure I did this particularly well but I enjoyed this more than the Glob thing last week, and for the assignment we could choose which week to submit, so here are my 2 submissions for Exercise 1:


For context, here are some examples the tutor provided from previous students. For some reason I can't explain, I find the full-face masks a bit... creepy, so I went with a less-is-more approach:


Turns out RMIT are quite speedy at getting results back and I got a Credit for this assignment, which I'm pretty happy with. If I'm honest, I didn't spend as much time on this as I could/should have because I wasn't that excited about it, and the feedback provided was all very interesting and informative so I'm pretty happy. :)

Final Grade: 17/25 - 68% (Credit)
Share:

Sunday 15 September 2013

MMC140 - Wk 3: Glob imagery

Theme & Style
The theme of this assignment - what you choose to portray - is completely open. You are free to create figures, creatures, scenery or abstract compositions etc.

However, the formal style of your imagery is, by contrast, relatively fixed by the visual characteristics of our source image (the Glob.jpeg) and the techniques and processes demonstrated in the tutorial movie. Therefore, the challenge of this assignment is to exercise imaginative freedom within the constraints of a pre-defined visual style.

Process
Building a cohesive single image from a large number of elements will require you to organise, group, plan, connect, transform and duplicate multiple image elements across multiple layers within Photoshop. However, in this assignment you shouldn’t begin with fixed ideas of a finished image. Spend some time experimenting with, and freely exploring, a range of visual ideas and forms. Be playful and let ideas emerge naturally from the forms you discover.

At some stage you will need to narrow your focus and become more organised as you work towards some distinct idea of what your image will be of, or about. But in the beginning at least, you should work with as little pre-determination as possible. To quote the Pablo Picasso “I don’t seek - I find”


I found this quite challenging - I've used Photoshop a fair bit, but never to create stuff like this and while I like to think I'm creative, if this is a benchmark then I'm clearly not! I understood the techniques but found the whole exercise a little.. boring. The first assignment is a choice between this week and next week so at this stage I'm planning on submitting next week's options purely because it looks more interesting!

 
Share:

Sunday 8 September 2013

MMC140 - Wk 2: Mandala patterns

The second activity assignment invites you to create your own unique images using the techniques you have learnt from the tutorial movies. In particular we would encourage you to 'Experiment Explore & Manage Options' as outlined in the first weeks notes. Most importantly this activity has been designed to get you working quickly, creatively and enjoyably with Photoshop. Show your images to friends and family. Invite them to comment and share their response to it. This will help you develop an objective idea of your works value as artwork. We encourage you to share your work with other students by uploading it to the Student Forum or alternatively to MySpace or Flickr.

Here are my 2nd week efforts (click for larger version):

     
Share:

Friday 30 August 2013

What I'm running on my Android, take 2

I previously blogged about this when I got my first Android back in 2010, the HTC Desire, which was the first Android smartphone. Best phone I'd ever had... until I got my current one! I've been meaning to update this for a while because a few friends have gone Android, so here goes.

The current list isn't much different from the old one. Most changes are either because newer apps came out that did the job better, or the new phone/new Android version includes those things by default so I don't need to install them any more. I won't link them all but if you search Google Play you'll be able to find them pretty easily:
  • The very first thing you absolutely should get is Swype. Trust me, it will change your life. :) Instead of poking/tapping away at that tiny little keyboard - Swype. Awesome. If you have a Samsung it may already be installed on your phone but you might need to set it as the default keyboard. If it's not installed, try searching for the trial version first but honestly... it will be the best 99c you spend today.
  • All the default "social" apps such as Facebook, Google+, LinkedIn, Flickr, Instagram, Blogger, Pinterest, etc.
  • TweetCaster for Twitter - I find this much better than the default Twitter app.
  • ColorNote Notepad Notes for quick on-the-spot notes (still can't find anything to sync with Outlook Notes though)
  • Dropbox (share files betwen PC and phone)
  • Springpad - I moved all my Outlook Tasks & Notes here after I gave up trying to find a way to sync them from Outlook to Android. Microsoft and Google just flat-out refuse to play ball. (You may prefer Evernote which is the most popular app in this area, but I wanted something I could access without a data connection and Evernote makes you pay for that privilege). I go by the idea that Dropbox is for file sharing, Springpad is for notes/list sharing. My husband and I have a couple of shared folders which is really useful.
  • ES File Explorer (I used to use OI File Manager which is also good but this one includes Dropbox etc.)
  • KeePassDroid (also install KeePass on PC, data file in Dropbox - always up-to-date password manager *wheee* geek-heaven!)
  • Key Ring (let's you store all those store cards)
  • Moon+ Reader - the best ebook reader I've found, it reads just about every file format.
  • QuickPic - I like this better than the standard Android Gallery, it's faster.
  • Silent Time Lite - lets you configure the phone to automatically go to Silent mode at certain times - I have a "Night" event which makes it all go silent at 9pm each night.There are a bunch of different ways to achieve this functionality now but I've had this one since 2010 so.. why change? :/
  • SMS Backup+ - love this, and you can't do this on an iPhone. Sends a copy of every SMS you send/receive to your email.
  • Weather Australia and Aussie Weather Radar - useful when at the footy to see if rain is coming!
  • A bunch of system apps including Advanced Task Killer, Clean Master, Juice Defender (helps manage battery life, although Android Jelly Bean includes this functionality), MyBackupPro (worth paying for, especially if you've rooted your phone, it backs up EVERYTHING - still backs up a lot if you haven't rooted).
  • Chrome and Firefox, still not sure which one I prefer, syncing bookmarks from my desktop PC isn't seamless in either.
  • Multimedia-style apps such as Shazam (must-have), HoytsAU, Foxtel Guide (handy if you have IQ and want to record something when you're out), etc..
  • Footy-related apps - AFL, Hawthorn, footytips.
  • Travel-related apps - Train Trapper (for Melbourne trains) - I personally think it's better than the official Metlink app,TripCase - my husband and I both use this for travel itineraries, an app called Airport to look up flight times, etc.
  • Google Translate - very useful on my recent South American trip.
  • TunnelBear (also have this on my PC) - free VPN, 500Mb data per month, you can pay for more.
  • eBay, Gumtree, Amazon AppStore (for the things you can't get in Google Play), a bunch of games and a bunch of other stuff I won't bother listing because it's not that interesting. :)
What apps are your must-haves? I'm always looking for new ideas :)

Edit 17-Sep-2013:
  • iSyncr - syncs your music, playlists, etc. from iTunes onto your Android device. I'm watching my favourite iTunes playlists sync via WiFi as I type! There's a trial version which lasts for 14 days and lets you sync up to 100 songs per playlist, and then it's US$3.99 to buy a full version. "Awesome" doesn't even start to cover this!

Share:

Thursday 29 August 2013

MMC140 Digital Imaging with Photoshop - Week 1

Time to dive back into study, which is a little daunting given the last unit I completed was NET205 in SP2 2012. I had a choice between a 3rd year core subject or my first elective so I thought it was wiser to ease back in with something completely different to the last (failed) attempt. Hence - MMC140 Digital Imaging with Photoshop.

The first paragraph of the Unit Guide states:

This Unit is not about learning PhotoShop – it’s about learning to use it effectively.
The software is just a tool. Although this Unit will teach you a range of very effective software skills and techniques, this in itself is not enough to use the Photoshop effectively.
You will not find an ‘Idea’ button anywhere in PhotoShop. People do ideas – not computers. Photoshop will not make suggestions on how you compose an image or choose colours etc. It only provides the tools that allow you to do it.
To use PhotoShop effectively requires the development of a range of noncomputer skills. You need to understand how images work within cultural and aesthetic contexts. You will learn to construct your own imagery more effectively via the research and analysis component of your projects. This will lead you to conceptual and stylistic insights that, in conjunction with advanced software techniques, will advance your visual art and design practices.


I'm actually a bit hyped about all this as I'm a self-taught Photoshopper - I know what I like but I don't have any real technical reasons why it should be that way, so I'm hoping this will fill in some gaps for me.

Week 1 is usually fairly low-key, introducing yourself and getting started. Our task this week was to create some unique images using the Photoshop techniques demonstrated in the tutorial. Here's what I came up with:

My first attempt looked a little alien-like - clearly been watching too much sci-fi lately!:
For attempt #2 I decided to try for an abstract butterfly... which unfortunately ended up looking a lot like Rice Bubbles!
I liked the background so I kept that and re-did my butterfly, changed the colours up a bit and I'm a lot happier with this version:


Share:

Friday 23 August 2013

Today is Daffodil Day..

Today is Daffodil Day. A day of reflection for me, remembering my Dad and Opa. You can help Cancer Council grow hope for a cancer-free future by donating online http://daffodilday.com.au/ or buying our wonderful merchandise being sold at sites across Australia.
Share:

Thursday 22 August 2013

Thursday 8 August 2013

My 9yo's "Young Impressionist" effort

My daughter's effort for the Grade 3/4 Young Impressionists art exhibit. Impressive, yes? :)
Grade 3/4 Young Impressionists art exhibit #school
Share:

Friday 19 July 2013

Donate to Wikipedia today

Just donated to Wikipedia. It's important to help keep such a vast resource free for everybody.
http://donate.wikimedia.org/
Share:

Monday 15 July 2013

Sydney, July 2013

Girl's weekend in Sydney. Didn't take many good pics but here are a couple:
http://www.flickr.com/photos/nicky70/sets/72157634670232127/
Share:

Saturday 6 July 2013

My son's schoolwork...

My son's schoolwork. "He has a lot of brown spots like he pood all over himself". Sigh.
Share:

Saturday 22 June 2013

Big fat Mumma Redback Spider. Yikes!

Big fat Mumma Redback Spider #yikes #MelbourneBig fat Mumma Redback Spider. Yikes!
Share:

Archive